Arbitrum Bridge: Your Complete Guide to Depositing and Withdrawing Assets
In today’s multi-chain cryptocurrency ecosystem, seamless asset transfers between blockchains are critical for efficient trading and decentralized finance (DeFi) applications. The Arbitrum Bridge is a powerful tool that allows users to deposit ETH or any ERC‑20 tokens from a parent chain (like Ethereum) to a child chain (such as Arbitrum One or Arbitrum Nova), and vice versa—withdraw assets from a child chain back to the parent chain. This comprehensive guide will walk you through the entire process step by step, so you can confidently move your funds across chains using Arbitrum’s bridge.
The Arbitrum Bridge is a critical tool for anyone looking to take advantage of the benefits offered by both the parent chain (such as Ethereum) and Arbitrum’s high-performance child chains. Whether you are depositing assets to benefit from lower fees and faster transactions or withdrawing them back to the parent chain, the detailed step-by-step process ensures a smooth experience.
By first obtaining the necessary native currency, adding the correct network to your wallet, and then carefully initiating your deposit or withdrawal through the bridge, you can seamlessly move your ETH or ERC‑20 tokens between chains. The process, though straightforward, demands careful attention to detail—especially when adding network parameters and waiting for the withdrawal countdown to complete.
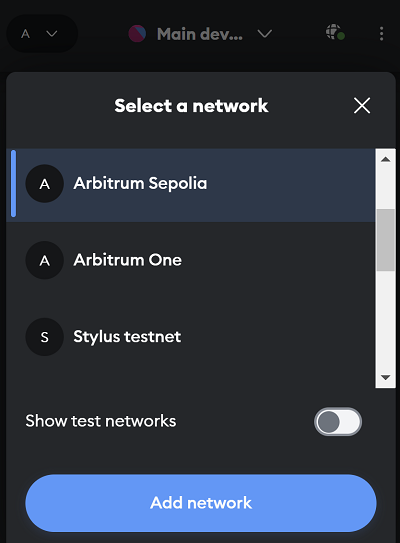
Image Source: Website
What is the Arbitrum Bridge?
The Arbitrum Bridge is a specialized tool provided by Arbitrum that facilitates the transfer of assets between different layers of blockchain networks. Designed to work with both deposits and withdrawals, the bridge ensures that you can move your tokens between Ethereum (or another parent chain) and Arbitrum or other Layer 2 chains with ease. By using a Web3 wallet such as Gate.io web3 wallet, users can interact with the bridge to deposit tokens on the child chain for faster, lower-fee transactions, or withdraw them back to the parent chain when needed.
For any users feeling stuck or uncertain during any step, the Arbitrum team is always ready to help—so be sure to join their Discord community and follow their updates on X (Twitter). This proactive support and robust community engagement further enhance the reliability of the Arbitrum Bridge.
Prerequisites for Using the Arbitrum Bridge
Before you can start using the Arbitrum Bridge, you must meet a simple prerequisite: ensure you have a compatible Web3 wallet installed. The most popular options include:
If you do not have one, you can visit Arbitrum’s portal page to download and install your Web3 wallet. Once you have installed your wallet, you are ready to begin the bridging process.
How to Deposit Assets: From Parent Chain to Child Chain
Depositing assets on Arbitrum involves transferring ETH or any ERC‑20 tokens from a parent chain (e.g., Ethereum) to a child chain (e.g., Arbitrum One). Here’s how you can do it step by step:

Step 1: Get Some Native Currency
To initiate a deposit, you’ll first need the native currency of your parent chain. For example, if you want to bridge assets from Ethereum to Arbitrum One, you will need ETH on the Ethereum network. There are several ways to acquire this native currency:
- Using a Centralized Exchange: Purchase ETH on major exchanges that support direct withdrawals to your Web3 wallet.
- On-Ramp Services: Use services that allow direct purchase of ETH and send it to your wallet.
- Request Funds from a Faucet: If you’re working on a testnet (such as Sepolia or Arbitrum Sepolia), you can request funds from a faucet.
With sufficient funds in your wallet, you are ready to move on to the next step.

Image Source: Website
Step 2: Add the Preferred Network to Your Wallet
To successfully bridge your assets, you must add the target network’s RPC endpoint to your wallet. Here’s how to do it using Gate.io:
Open Your Web3 Wallet Extension: Click on Gate.io wallet in your browser.
Click the Network Selector: Usually found at the top-left corner of the wallet interface.
Add Network Button: Click the “Add Network” button at the bottom of the network dropdown list.
Add Manually: Choose “Add a network manually.”
Enter Network Parameters: Input the information corresponding to the chain you wish to deposit your assets to. For example, here are some common Arbitrum chains:

By adding your desired network, you ensure that your wallet can interact with the corresponding blockchain and display your funds correctly once they arrive.

Image Source: Website
Step 3: Initiate the Deposit
Now that your wallet is set up with the required network, you’re ready to deposit your assets using the Arbitrum Bridge. Follow these steps:
Visit the Arbitrum Bridge: Open bridge.arbitrum.io in your browser.
Log In With Your Wallet: Connect your Web3 wallet to the bridge. Ensure that your wallet is connected to the source network (from which you’re depositing assets).
Select the Destination Network: Choose the child chain (e.g., Arbitrum One or Arbitrum Nova) as your target for the deposit.
Choose the Token: Select the token you want to bridge from the token drop-down menu. You can manage your token lists by clicking the “Manage token lists” button at the bottom right corner.
Enter the Amount: Input the amount of ETH or ERC‑20 tokens you wish to deposit in the “From” box.
Move Funds: Click the “Move funds” button, and follow the prompts on your Web3 wallet to confirm the transaction.
After submitting the transaction, expect your funds to arrive on the destination chain within 15-30 minutes (depending on network congestion). Make sure you switch your wallet’s network to the destination chain to verify that your funds have arrived.
How to Withdraw Assets: From Child Chain to Parent Chain
Withdrawing assets via the Arbitrum Bridge is equally straightforward, though it involves a longer wait time compared to deposits. Here’s how to withdraw ETH or ERC‑20 tokens from a child chain back to the parent chain:

Image Source: Website
Step 1: Log in to the Arbitrum Bridge and Set Up Your Source Network
- Open the Bridge: Start by visiting bridge.arbitrum.io.
- Connect Your Wallet: Ensure your wallet is connected to the source network (the child chain from which you want to withdraw).
- Select the Destination Network: Choose the parent chain, such as the Ethereum mainnet, as your target network.

Image Source: Website
Step 2: Initiate the Withdrawal
Select the Token: From the token drop-down menu, choose the token you wish to withdraw.
Enter the Amount: Enter the amount of ETH or ERC‑20 tokens you plan to bridge to the parent chain.
Click “Move Funds”: Initiate the withdrawal process by clicking the “Move funds” button. Follow the prompts provided by your Web3 wallet to complete the transaction.

Image Source: Website
Step 3: Wait for the Withdrawal Countdown
After you have submitted your withdrawal request, a countdown timer will appear on the bridge interface, indicating that you’ll receive your funds back on the parent chain in approximately 7-8 days. This delay is a standard part of the withdrawal process designed to ensure the security and finality of the operation.
Step 4: Claim Your Funds
Once the countdown period has elapsed:
- Check the Withdrawal Status: You can track the progress of your withdrawal by clicking on your profile in the top right corner of the bridge interface, then opening the “Transactions” tab.
- Switch the Network: Change your wallet’s network to the destination chain (e.g., Ethereum mainnet) to view your funds.
- Press the Claim Button: When the “Claim” button becomes active (typically indicated by a blue color), click it to complete the process and receive your assets.
This withdrawal mechanism may seem lengthy, but it is crucial for maintaining the security of cross-chain transfers.
Best Practices and Tips for Using the Arbitrum Bridge
To ensure a smooth experience with the Arbitrum Bridge, consider the following tips:
1. Double-Check Network Settings
Before initiating any transfer, make sure your wallet is connected to the correct network. This includes both the source network (from which you are depositing or withdrawing assets) and the destination network (where you expect to receive them).
2. Keep an Eye on Network Congestion
During periods of high network traffic, transaction times can increase. Being aware of the current network congestion can help you plan your deposits and withdrawals accordingly.
3. Stay Updated via Discord and Social Media
If you ever find yourself stuck or unsure about any step in the process, don’t hesitate to reach out for help. Arbitrum’s team and community are active on Discord and Twitter (now known as X), where you can get real-time support and updates.
4. Use Reliable Sources for RPC Endpoints
When adding a new network to your wallet, always verify the RPC URL, chain ID, and other parameters from official documentation or trusted resources. Incorrect settings can lead to transaction errors.
Why Use the Arbitrum Bridge?
The Arbitrum Bridge offers several significant advantages:
- Speed and Efficiency: Thanks to the underlying technology of Arbitrum, asset transfers are faster and more cost-effective compared to executing transactions directly on Ethereum.
- Lower Fees: Reduced gas fees on the child chains mean that users can save money when depositing or withdrawing assets.
- Seamless Cross-Chain Transfers: The bridge simplifies the complex process of moving assets between different networks, making it accessible even for users who are new to cross-chain transactions.
- Enhanced Security: By following a structured withdrawal process with a waiting period, the bridge ensures that all transfers are secure, protecting your assets from potential risks.
Conclusion
In summary, the Arbitrum Bridge represents not just a technological advancement but a practical, user-friendly gateway in the world of decentralized finance. Whether you’re a seasoned blockchain veteran or new to the crypto space, the bridge empowers you to tap into the vast potential of Layer 2 solutions—offering speed, cost-efficiency, and enhanced security.
Embrace the future of cross-chain connectivity with the Arbitrum Bridge, and enjoy the freedom to transfer your assets seamlessly between networks. With its easy-to-follow process and comprehensive support, moving your digital wealth across chains has never been easier.
Disclaimer: Cryptocurrency investments carry risks. Always conduct thorough research before investing.
Share
Content


Related Articles

Pi Coin Transaction Guide: How to Transfer to Gate.io
Flare Crypto Explained: What Is Flare Network and Why It Matters in 2025

How to Use a Crypto Whale Tracker: Top Tool Recommendation for 2025 to Follow Whale Moves

2025 BTC Price Prediction: BTC Trend Forecast Based on Technical and Macroeconomic Data

What is N2: An AI-Driven Layer 2 Solution